

With the Holiday Season upon us, it is never too early to get started on creating some lovely and inexpensive gifts for your friends and family that they are going to LOVE!
You can guarantee that anyone would be happy to receive one or more gifts from this fun collection.
1. DIY Bath Fizzies

Ice-cube trays serve as molds, giving the fizzies their shape. Using a flexible silicone model lets you slide the cubes out smoothly without breaking them. Show off the colors of the bath fizzies in glass jars with screw tops, the kind used for storing sugar and flour. Pack each type of fizzy in a separate jar so the scents won't meld. Write the name of the scent on a vellum tag (choose a shade that matches the fizzies), and punch a hole in the top. Thread the tag with ribbon, and tie it around the jar. Citric acid, a common food additive, is available at wine-making-supply stores, some spice shops, and online. When citric acid is combined with baking soda and placed in water, a chemical reaction creates bubbles.
*Makes 1 dozen (Use 2 per bath).

MATERIALS
-
1/2 cup citric acid
-
1 cup baking soda
-
3/4 cup cornstarch
-
1/4 cup organic cane sugar
-
About 6 drops food coloring
-
10 to 15 drops essential oil(s)
-
Special equipment: 2-ounce travel-size spray bottle, plastic pipette, silicone ice-cube tray, storage jars
- 1/2 cup citric acid
- 1 cup baking soda
- 3/4 cup cornstarch
- 1/4 cup organic cane sugar
- About 6 drops food coloring
- 10 to 15 drops essential oil(s)
- Special equipment: 2-ounce travel-size spray bottle, plastic pipette, silicone ice-cube tray, storage jars
STEPS
-
Stir together citric acid, baking soda, and cornstarch in a glass measuring cup.
-
Pass mixture through a fine sieve or a flour sifter into a mixing bowl. Stir in sugar.
-
Fill spray bottle with water, and add food coloring. Spritz mixture lightly (it should become damp but not fizzy) until you can pack mixture with your hands.
-
Using pipette, add oil, 1 drop at a time, until strength of scent is to your liking. Using a metal spoon or your hands, mix ingredients until color is even throughout (mixture will begin to dry out; when this happens, spritz until packable again).
-
Spoon into ice-cube tray, pressing firmly. Let dry at room temperature overnight. Pop out of tray gently. Transfer to jars.
2. Quick Bread Recipe in a Jar

Cool weather puts us in the mood to bake. So why not give a friend a head start? Layer the dry ingredients for this easy quick bread into a milk bottle or 1-quart mason jar. To fit, tamp each layer well (with chips and nuts on top). Then all that's left is to add the wet ingredients and bake.
- Stir together citric acid, baking soda, and cornstarch in a glass measuring cup.
- Pass mixture through a fine sieve or a flour sifter into a mixing bowl. Stir in sugar.
- Fill spray bottle with water, and add food coloring. Spritz mixture lightly (it should become damp but not fizzy) until you can pack mixture with your hands.
- Using pipette, add oil, 1 drop at a time, until strength of scent is to your liking. Using a metal spoon or your hands, mix ingredients until color is even throughout (mixture will begin to dry out; when this happens, spritz until packable again).
- Spoon into ice-cube tray, pressing firmly. Let dry at room temperature overnight. Pop out of tray gently. Transfer to jars.
2. Quick Bread Recipe in a Jar

Cool weather puts us in the mood to bake. So why not give a friend a head start? Layer the dry ingredients for this easy quick bread into a milk bottle or 1-quart mason jar. To fit, tamp each layer well (with chips and nuts on top). Then all that's left is to add the wet ingredients and bake.
ingredients
2 cups all-purpose flour
- 1 cup rolled oats
- 1/2 cup granulated sugar
- 1/2 cup brown sugar
- 2 teaspoons baking powder
- 1 teaspoon baking soda
- 1/2 teaspoon cinnamon
- 1/2 teaspoon salt
- 1/2 cup chopped walnuts
- 1/2 cup miniature chocolate chips
- 1/2 cups buttermilk
- 2 large eggs
- 1/4 cup melted butter
STEPS
1. In a large bowl, mix the contents of this bottle: 2 cups all-purpose flour, 1 cup rolled oats, 1/2 cup granulated sugar, 1/2 cup brown sugar, 2 teaspoons baking powder, 1 teaspoon baking soda, 1/2 teaspoon cinnamon, 1/2 teaspoon salt, 1/2 cup chopped walnuts, and 1/2 cup miniature chocolate chips.
2. In a small bowl, beat 1 1/2 cups buttermilk, 2 large eggs, and 1/4 cup melted butter.
3. Stir wet mixture into dry ingredients just until evenly moistened (batter will be lumpy).
4. Scrape into a buttered and floured 9- by 5-inch loaf pan (with a 9-cup capacity), and bake in a 350° oven until a wooden skewer inserted in the center comes out clean, about 50 minutes.
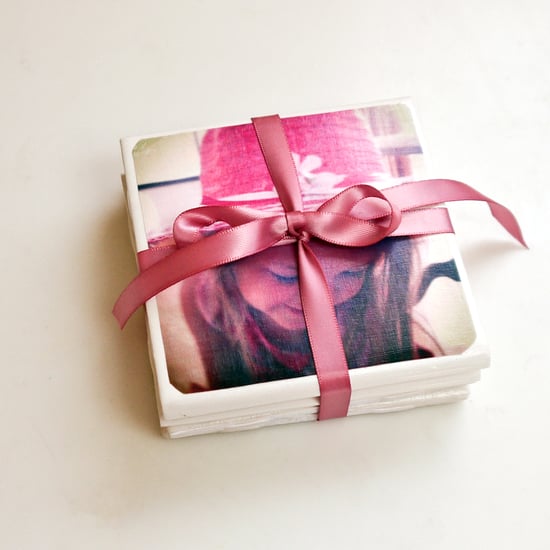
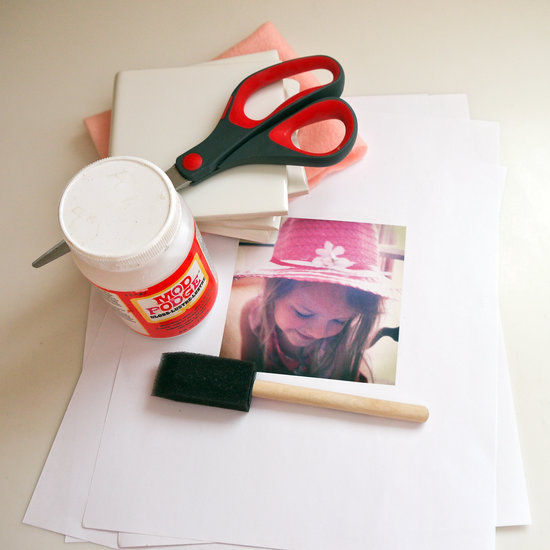
3. Photo Coasters
MATERIALS
Four 4-by-4-inch white tiles
Four 4-by-4-inch square pictures
Scissors
Mod Podge
Foam brush
Felt
Hot glue gun
Length of ribbon
Clear spray sealant
Four 4-by-4-inch white tiles
Four 4-by-4-inch square pictures
Scissors
Mod Podge
Foam brush
Felt
Hot glue gun
Length of ribbon
Clear spray sealant
STEPS
1. Pick up small white tiles at your local home goods store, which will run you less than a dollar each. You can also go with a colored tile for a more personalized DIY. Select pictures to use for the project, resize to four by four inches on your computer, then print.
 2. Cut out the pictures, rounding the edges, which gives the finished photo coasters a nice look. Coat the front of the tile with a thin layer of Mod Podge, then center and press a picture to the tile. Let dry for 20 minutes, then coat the top of the picture with a light coating of Mod Podge, brushing horizontally then vertically. Let dry for another 20 minutes and then lightly coat again, sealing the top of the coaster and ensuring the photo is completely adhered to the tile.
2. Cut out the pictures, rounding the edges, which gives the finished photo coasters a nice look. Coat the front of the tile with a thin layer of Mod Podge, then center and press a picture to the tile. Let dry for 20 minutes, then coat the top of the picture with a light coating of Mod Podge, brushing horizontally then vertically. Let dry for another 20 minutes and then lightly coat again, sealing the top of the coaster and ensuring the photo is completely adhered to the tile.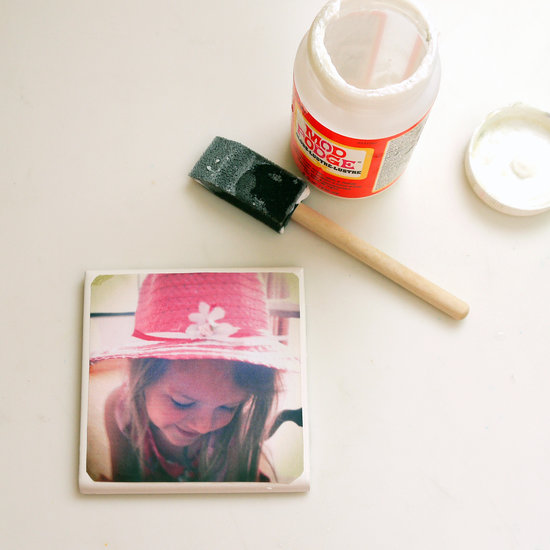
3. Cut four small one-inch squares from the felt for each tile, and use a hot glue gun to stick one square of felt to each corner of the tile. Give the dry photo coasters a quick coat of clear spray sealant, which will completely moisture-proof the finished project.

4. Wrap the finished stacked tile photo coasters with a length of ribbon, and they are ready to give to someone special. Or keep them for yourself and enjoy the next time you're savoring your favorite beverage.
4. Fabric Covered Books
MATERIALS
Books

Fabric
Hot glue gun
Scissors
Butter knife
Spray adhesive
Before you get started, I recommend ironing the fabric if there are any creases in it. And remove the book jacket, obviously. Also, cut your fabric with roughly 1-2 inches of overhang all the way around the book.
Books

Fabric
Hot glue gun
Scissors
Butter knife
Spray adhesive
Before you get started, I recommend ironing the fabric if there are any creases in it. And remove the book jacket, obviously. Also, cut your fabric with roughly 1-2 inches of overhang all the way around the book.
STEPS
Begin by spraying the spray adhesive on the back book cover and spine. Don’t go too wild and crazy. Just give it a nice coating. Turn the book over, position it on the fabric how you want it, press down, turn it over so the back is now facing you, and smooth it out with your hand. Do the same for the front cover.
Begin by spraying the spray adhesive on the back book cover and spine. Don’t go too wild and crazy. Just give it a nice coating. Turn the book over, position it on the fabric how you want it, press down, turn it over so the back is now facing you, and smooth it out with your hand. Do the same for the front cover.

You should leave at least 1 inch of excess fabric around the book. You can always cut the fabric down if you have more than an inch.

Cut two slits on each side of the spine. We’ll come back to the spine later.

Grab your glue gun. Add some glue along the longer edge of fabric where it will meet up with the book. Don’t go completely to the edges of the fabric. Fold over onto the inside cover.
Put a dab of glue where the fabric meets on the corner. Press the fabric together.
 Run some glue along the edge of the fabric. Secure the fabric to the inside of the cover.

I fold the outer corners in a little bit and glue them into place so the finished product looks like this.
 Now, onto the spine. I recommend cutting the fabric to 1/2 inch.


Get that butter knife and use it to fold the piece of fabric into the spine. You can use a little dab of glue to secure the fabric if you want.

This is how the spine should look after using the butter knife.


Cut two slits on each side of the spine. We’ll come back to the spine later.

Grab your glue gun. Add some glue along the longer edge of fabric where it will meet up with the book. Don’t go completely to the edges of the fabric. Fold over onto the inside cover.
Put a dab of glue where the fabric meets on the corner. Press the fabric together.


I fold the outer corners in a little bit and glue them into place so the finished product looks like this.


Get that butter knife and use it to fold the piece of fabric into the spine. You can use a little dab of glue to secure the fabric if you want.

This is how the spine should look after using the butter knife.
5. Beeswax Candle

MATERIALS
Beeswax Sheets in Natural
Wick
Scissors
Little Muslin Bags for Packaging.
Beeswax Sheets in Natural
Wick
Scissors
Little Muslin Bags for Packaging.
Wick
Scissors
Little Muslin Bags for Packaging.
STEPS
Step 1: For the size of candle pictured here you can get 16 candles out of each sheet. Step one is to fold and cut the sheet into 16 pieces.
Step 2: The wick has a top and a bottom so cut a piece of wick but pay attention and leave the top of the wick hanging out the top about an inch.
Step 3: Start with the wick at the edge and begin rolling up the beeswax. At the end gently push the seam into the candle to seal.
Step 4: The wax is a little sticky so you can use a glass bowl or cup as a candle holder by pushing the candle into the dish and making in stick in place.
Comments
Post a Comment